
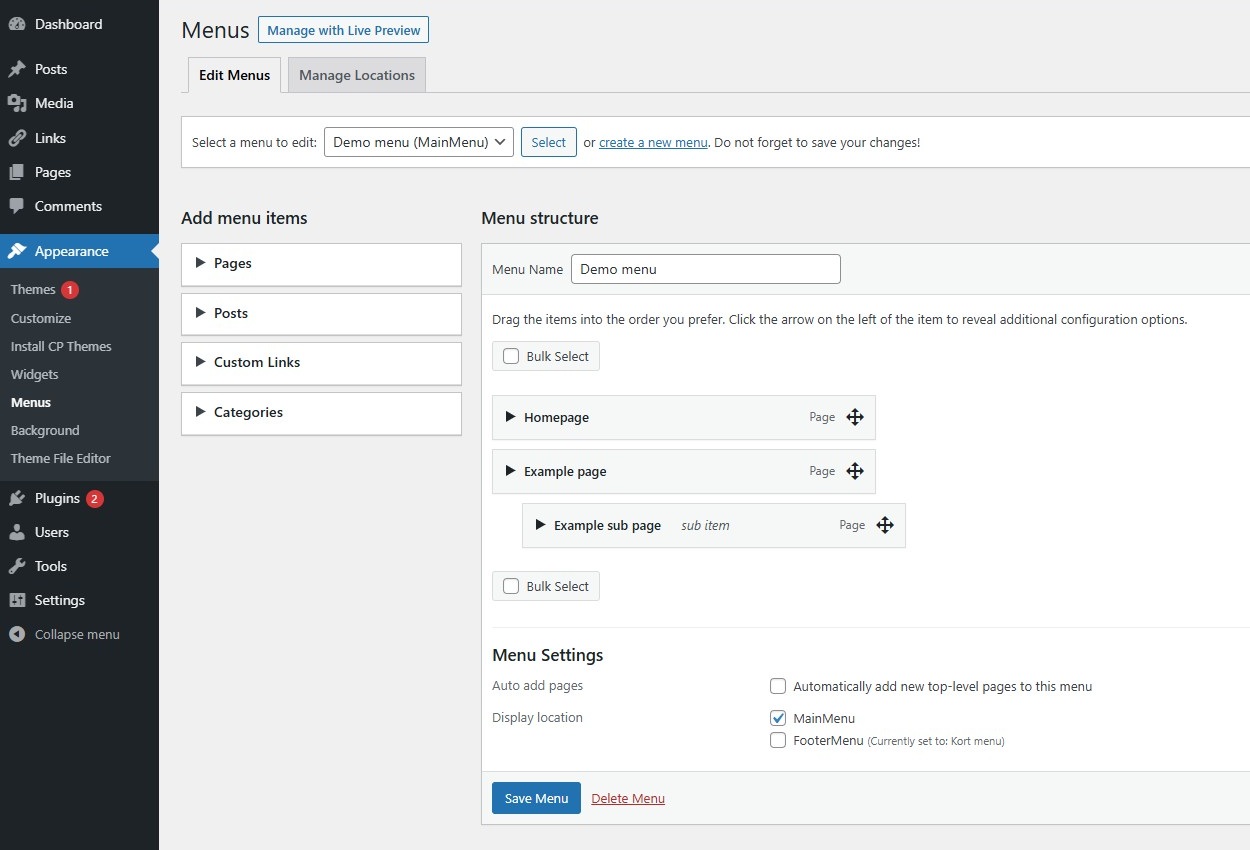
The Menus Screen enables you to create a custom menu (also known as navigation menu). It is a section of the site that helps visitors to navigate the site. Depending on the theme used, typically a site will have one menu, while some themes may enable additional menus. Our The ClassicPress Theme, for example, lets you display a second menu in the footer section. It is essential to have a simplified, so as not to confuse your visitors.
The Menus Screen is accessible via the administration > Appearance > Menus.
Screen OptionsLink to this section
The Screen Options allow you to choose which columns are displayed, or not displayed, in the underlying table. Clicking on the Screen Options tab shows a list of the columns with a check-box next to each column. Check the box for each column you want displayed in the table, or uncheck the box to not display that column. In addition, you can enable various advanced menu properties, which allows you to customize each individual link even more.
Creating menusLink to this section
- Click the link “Create a new menu” at the top of the page.
- Enter a name for your new menu in the Menu Name box.
- Click the Create Menu button.
If you have created multiple menus, then you are able to switch between them via the “Select a menu to edit” at the top of the page.
Adding menu itemsLink to this section
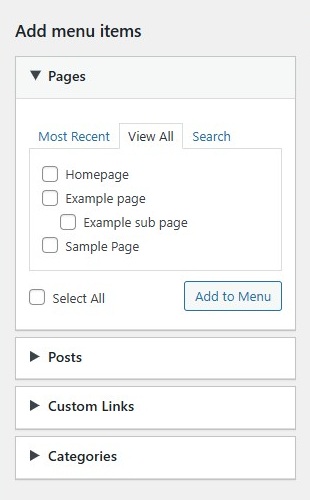
You can add different item types to your menu, such as pages, categories, or even custom links. These are split between panes left of the menu you’re currently editing.
An example on how to add link to a page:
- Open the Pages pane.
- Within this pane, select the “View All” link to bring up a list of all the currently published pages on your site.
- Select the pages that you want to add by clicking the checkbox next to each page’s title.
- Click the “Add to Menu” button located at the bottom of this pane to add your selection(s) to the menu that you created in the previous step.
- Click the Save Menu button once you’ve added all the menu items you want.
Your custom menu has now been saved.
Note: The Screen Options allow you to choose which items you can use to add to a menu. Certain items, like Tags are hidden by default.
Deleting a menu itemLink to this section
- Locate the menu item that you want to remove in the menu editor window.
- Click on the arrow icon on the left of the menu item to expand it.
- Click on the “Remove” link. The menu item will be immediately removed.
- Click the “Save Menu” button to save your changes.
Deleting menu items in bulkLink to this section
- To delete multiple menu items at once, click on the checkbox “Bulk Select”.
- Select the checkbox next to each of the menu items you wish to delete.
- Click “Remove Selected Items”. This will delete the selected menu items from the menu in bulk.
Creating multi-level menusLink to this section
The ClassicPress menu editor allows you to create multi-level menus using a simple “drag and drop” interface. Drag menu items up or down to change their order of appearance in the menu. Drag menu items left or right in order to create sub-levels within your menu.
To make one menu item a subordinate of another, you need to position the “child” underneath its “parent” and then drag it slightly to the right.
- Place the mouse cursor over the cross-arrow of the “child” menu item.
- Whilst holding the left mouse button down, drag it to the right.
- Release the mouse button.
- Repeat these steps for each sub-menu item.
- Click the “Save Menu” button in the Menu Editor to save your changes.
Adding menu to your siteLink to this section
If your current theme supports custom menus, you will be able to add your new menu to one of the “Display locations”.
- Scroll to the bottom of the menu editor window.
- Under Menu Settings > Display location, click the check box for the location where you want your menu to appear.
- Click “Save Menu” once you’ve made your selection.
Rearranging and configuring menu itemsLink to this section
Once an item is added to a menu, those menu items can be rearranged. Placing the mouse cursor over the cross-arrow, hold the left mouse button down, drag the menu item to where you want to place it, then release the mouse button (this is called drag-and-drop). Remember you can drag a menu item slightly to the right of the menu item above it to create a hierarchy (parent/child) relationship in the menu.
Each menu item has a configuration arrow icon on the left of the menu item, that when clicked opens the configuration box. Click the arrow a second time to close the configuration box. If you don’t see Link Target, Title Attribute, CSS Classes, Link Relationship (XFN), and Description, then under Screen Options make sure those boxes are checked to expose them here.
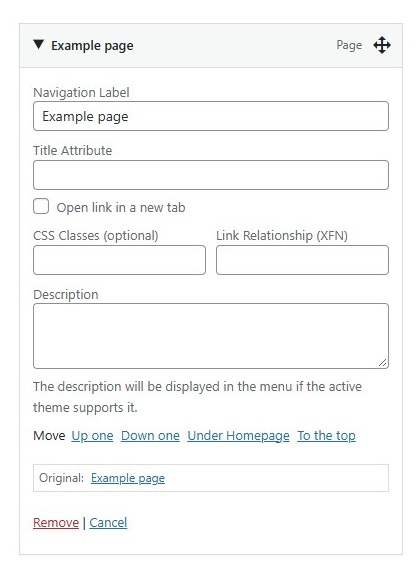
The configuration choices are:
- Navigation Label – The label for this particular menu item.
- Title Attribute – The attribute used when displaying the label.
- Open link in a new tab – Click the checkbox to open the menu item in a new tab.
- CSS Classes – Optional CSS Classes for this menu item.
- Link Relationship (XFN) – Allows for the generation of XFN attributes automatically so you can show how you are related to the authors/owners of site to which you are linking. See Link Relationship in the Link Manager document for details.
- Description – Description for this link. The description will be displayed in the menu if the current theme supports it.
- Move – Links to move the menu item Up one level, Down one level, Under or out from the above menu item as its child.
- Original – A link to the original source of the menu item (e.g. a link to view the page).
- Remove – Remove this menu item from the menu.
- Cancel – Cancel the configuration of the menu item.