Media consists of the images, video, recordings, and files that you upload and use on your site. Media is typically uploaded and inserted into the content when writing a post or a page.
The Uploading Setting in the Settings > Media screen describes the location and structure of the upload directory (where your media files are stored).
In ClassicPress version 2.1 media categories and tags are included, to improve the organizing of uploaded files. These can be used just like categories and tags for posts. Currently it’s an admin feature only, so you cannot use it to organize files on the frontend of your site.
If you do need to upload media, even if that media is not related to a post or page, then you need to use the Media > Add New screen.
Media libraryLink to this section
The media library screen allows you to edit, view, and delete media previously uploaded to your site. Multiple media objects can be selected for deletion. Search and filtering ability is also provided to allow you to find the desired media.
The media library provides two type of views. One is a simple visual grid view and the other is the conventional list view. You can switch between these views using the icons to the left above the screen.
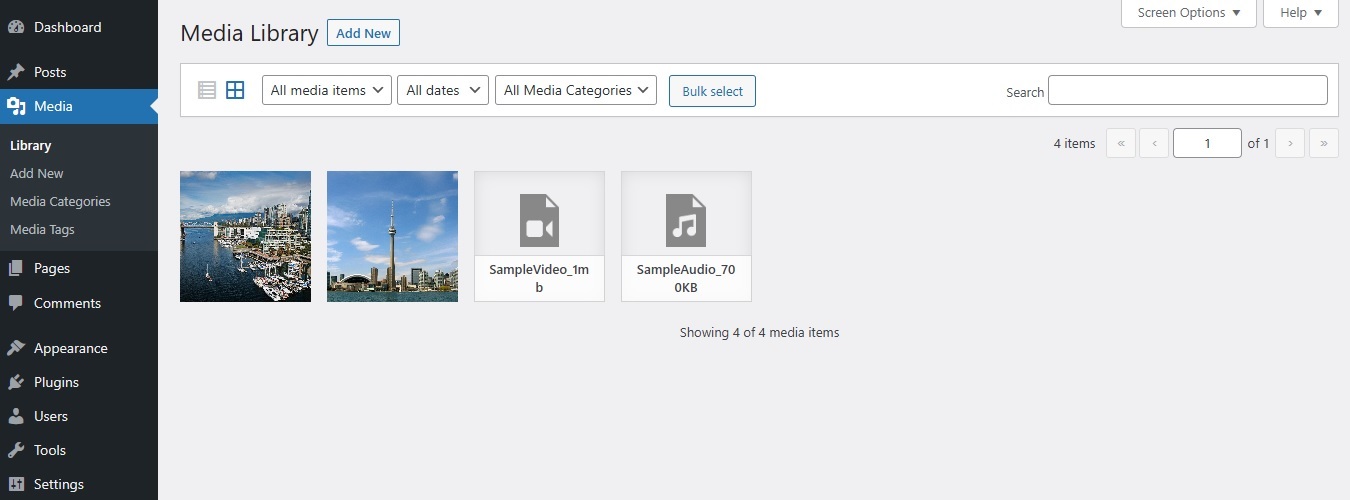
Media library grid viewLink to this section
In media library grid view, thumbnails of image, audio icons and movie icons are arranged in a grid.
Page navigation (grid view)Link to this section
Under the Screen Options, the number of media displayed per page is determined. If more than one page of media is available, two double-arrow boxes to move to the first and last page are provided. Also two single-arrow boxes are displayed to move one page backward or forward. Finally, a box showing the current page number can be used to enter a page to directly display.
Screen options (grid view)Link to this section
The Screen Options allow you to set the number of Media items to display in the table of media. Click the Screen Options tab again to close the Screen Options.
Filtering options (grid view)Link to this section
At the top of grid view, you can filter the media by media type, media category and date:
- Media type – This dropdown allows you to select, by media type such as images, audio, video or unattached to any posts nor pages, which media are displayed. By default, All media items is selected and all of your media are displayed.
- Date – This dropdown allows you to select, by date, which media are displayed in the grid view. By default, All dates is selected and all of media are displayed.
- Media category – This dropdown allows you to select by media category (if available). By default, All Media Categories is selected.
- Search – To the right, is a search box where you can enter a word, or series of words to search and display all the media meeting your search words. The search results will be updated as you type.
- Bulk select – Clicking this button makes it possible to select one or multiple files to be deleted.
Delete media (grid view)Link to this section
To delete media items, click the Bulk select button at the top of the screen. Select any items you wish to delete, then click the Delete permanently button. Clicking the Cancel button takes you back to viewing your media.
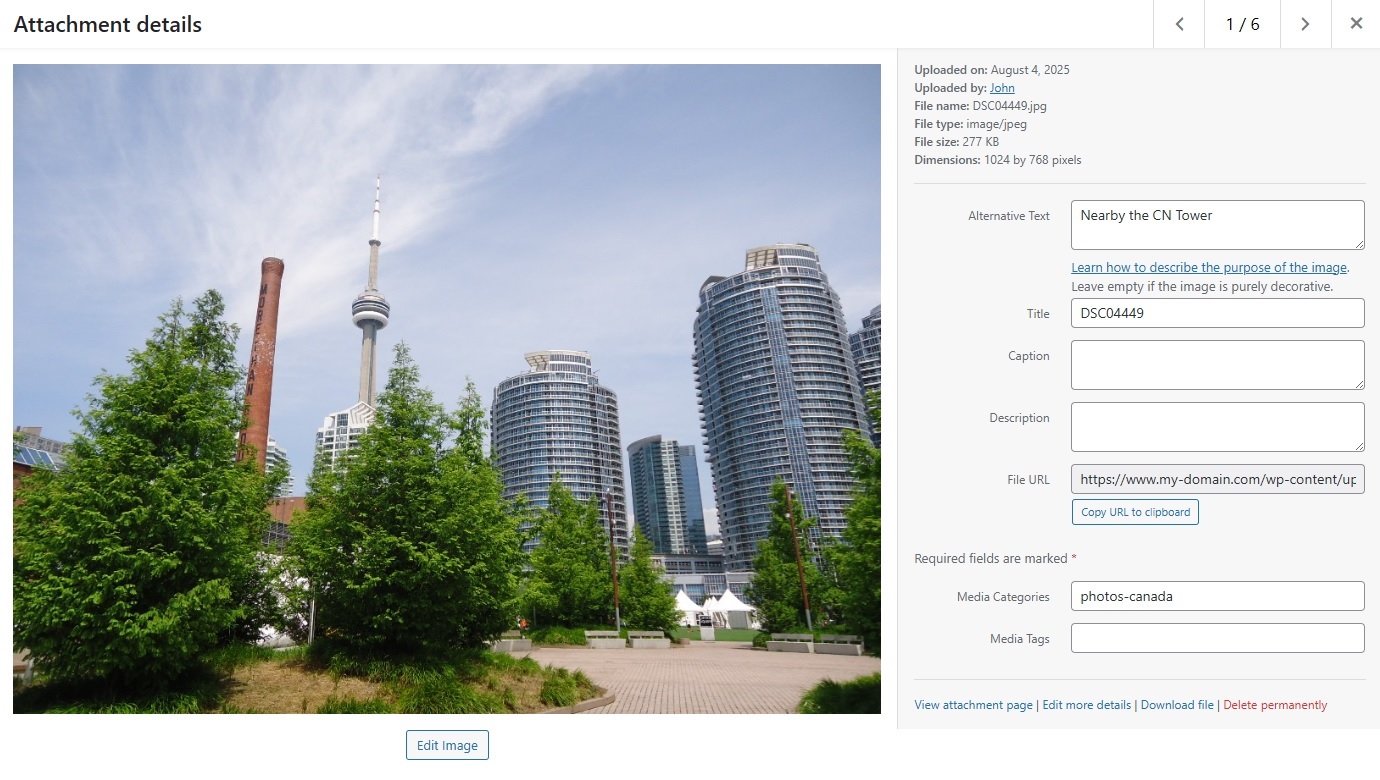
Attachment details (grid view)Link to this section
In the media library grid view, clicking an image thumbnail or a file icon will display an attachment details dialog, which allows you to preview media and make quick edits.
Any changes you make to the attachment details will be automatically saved.
You can also delete individual items and access the extended edit screen from the details dialog.
Use the arrow buttons at the top of the dialog, or the left and right arrow keys on your keyboard, to navigate between media items quickly.
The attachment details screen will change its appearance and information according to media type.
The left side of this dialog shows the image, audio player or video player. The right side lists the following media file attributes and optional data. Some of them are editable from this dialog.
- Uploaded on – The date when the media file was uploaded.
- Uploaded by – author who uploaded the media.
- File name – The name of the media file.
- File type – The MIME Type of media file.
- File size – The file size of the media file.
- Dimensions – (Image files only) The dimensions of image media.
- Alternative Text – (Image files only) The alt text for the image, e.g. “The Mona Lisa” to describe the media. Used for accessibility.
- Title – The name of the media. A title is often shown on attachment pages and galleries if themes or plugins are designed to display it.
- Caption – A brief explanation of the media.
- Description – An explanation of this particular media.
- File URL – Read-only display of a direct link to the media file.
- Copy URL to clipboard – Click to copy the URL of the file into the clipboard.
- Media Categories – The media categories assigned to the media file.
- Media Tags – The media tags assigned to the media file.
At the bottom there are four links:
- View attachment page – Shows the media in a simulated view of how the image would look when displayed in your theme.
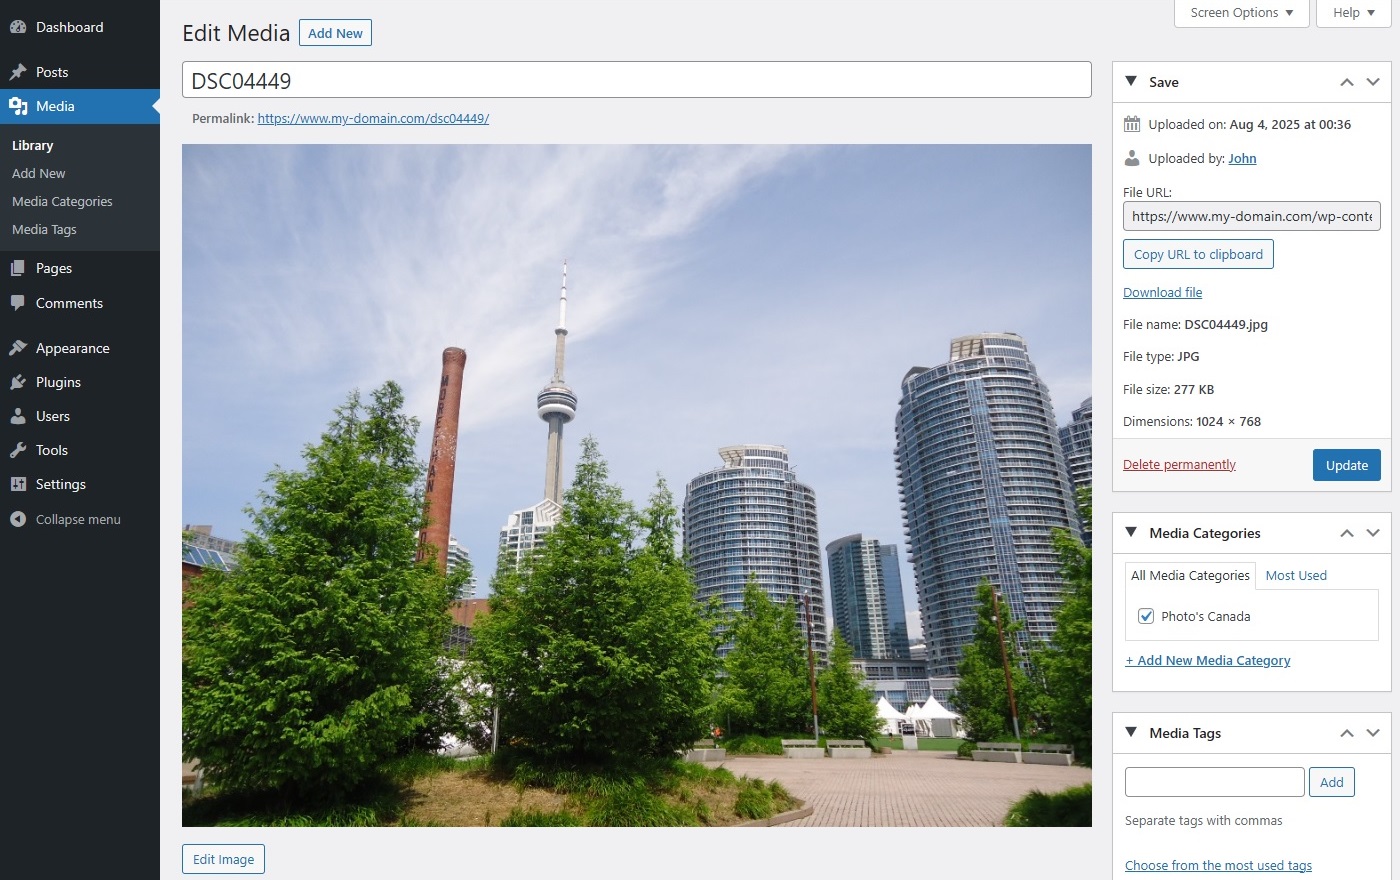
- Edit more details – Displays the Edit Media screen. See the Attachment details section for details on editing media information.
- Download file – Downloads the media.
- Delete permanently – Deletes the media.
Below images, there is a button to edit the image. This allows you to make edits such as rotate, scale, and crop.
Media library list viewLink to this section
In media library list view, a table lists all of your media, by row. The media are listed with the newest uploaded media first.
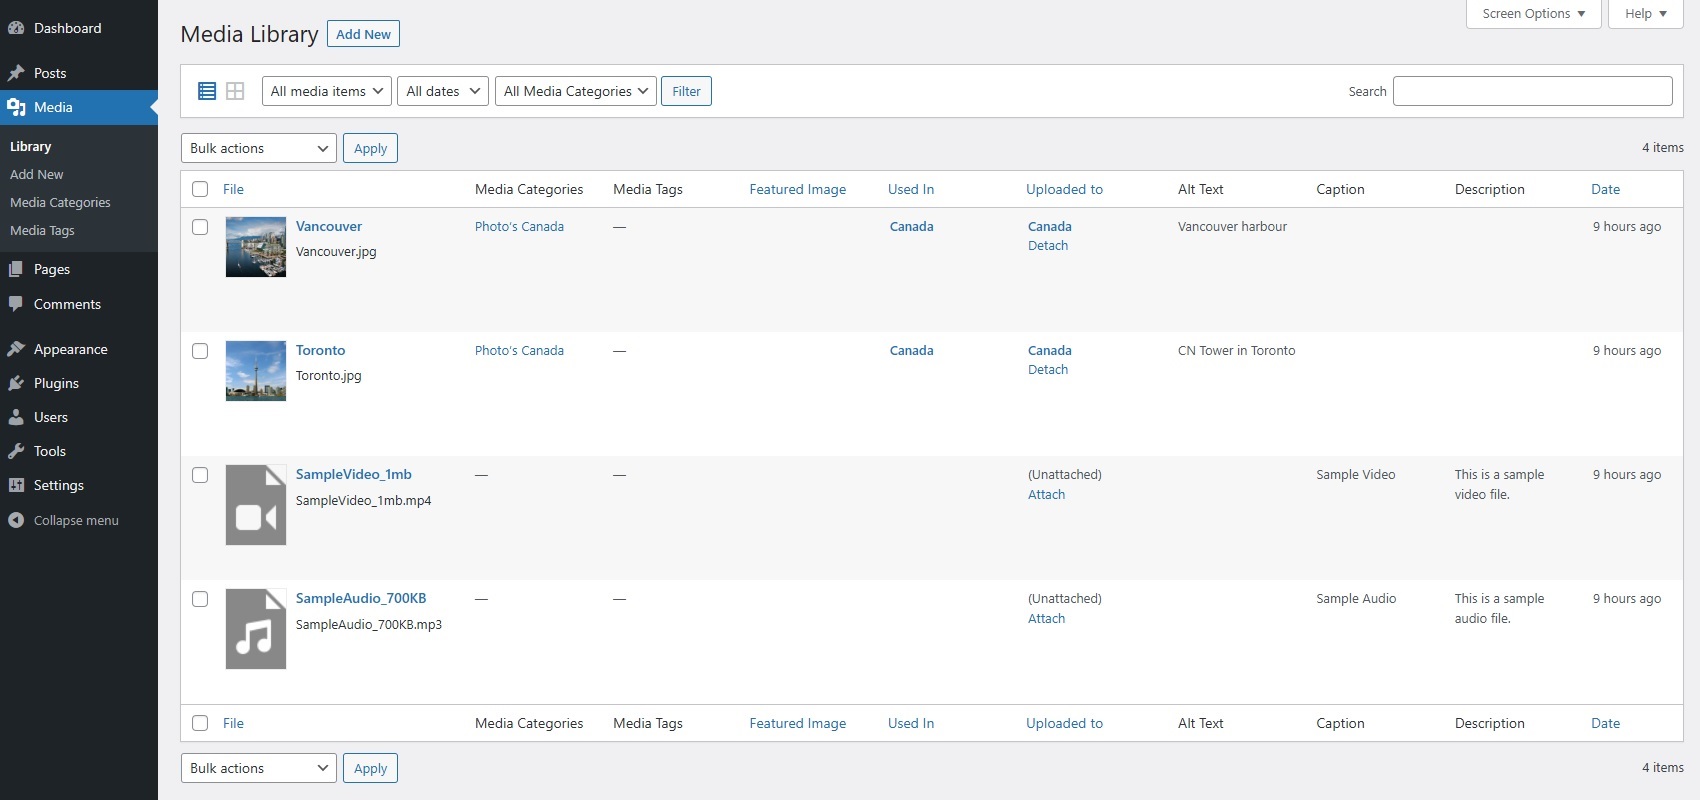
Table of media (list view)Link to this section
The table of media contains the following columns:
- [ ] – This checkbox, when clicked (checked), selects that particular media to be processed by a bulk action.
- “thumbnail” – There is no column heading for “thumbnail”, but a small image of the actual media is displayed in this column.
- File – Displayed in the form of a link, this is the title, the name of the media. Clicking the title link opens Edit Media screen. See the Attachment details section for details on editing media information. Below the title, the actual name of the file that holds this particular media is displayed.
- Author – Displayed in the form of a link, this is the author who uploaded the media. Clicking the author link causes all the media authored by that user to be displayed in the table of media (thus allowing a bulk action to be applied to all media for a given author).
- Media Categories – The media categories assigned to the media file.
- Media Tags – The media tags assigned to the media file.
- Featured Image – In which posts and pages the file is set as featured image. Click on the title to view that post or page in an edit screen.
- Used In – Title of the post or page that contains this media. Click on the title to view that post or page in an edit screen.
- Uploaded to – Title of the post or page where the media is uploaded to. Click on the title to view that post or page in an edit screen. If the media was unattached to any post or page, an Attach link will appear and when clicked this media can be attached to selected posts or pages. If the media has been attached to more than one post or page, only the details of the first post or page will be displayed.
- Comment bubble – Each media row has a comment bubble with the number of comments for that media. If a media has any comments, then the number of comments is displayed in a bubble. Clicking on a blue comment bubble causes the comments screen to be displayed to allow moderation of those comments.
- Alt Text – (Image files only) The alt text for the image, e.g. “The Mona Lisa” to describe the media. Used for accessibility.
- Caption – A brief explanation of the media.
- Description – An explanation of this particular media.
- Date – The date when the media was uploaded.
Sortable columns (list view)Link to this section
Some column headings, such as the File, Author, Used In, Uploaded to, and Date headings, can be clicked to sort the table of media in ascending or descending order. Hover over the column title, e.g. File, to see the up arrow or down arrow. Click the heading to change the sort order.
Page navigation (list view)Link to this section
Under the Screen Options, the number of media displayed per page is determined. If more than one page of media is available, two double-arrow boxes to move to the first and last page are provided. Also two single-arrow boxes are displayed to move one page backward or forward. Finally, a box showing the current page number can be used to enter a page to directly display.
Screen options (list view)Link to this section
The Screen Options allow you to choose which columns are displayed, or not displayed, in the underlying table. In addition, the number of Media items to display in the table of media can be set. Click the Screen Options tab again to close the Screen Options.
Filtering options (list view)Link to this section
At the top of list view, you can filter the media by media type, media category and date:
- Media type – This dropdown allows you to select, by media type such as images, audio, video or unattached to any posts nor pages, which media are displayed. By default, All media items is selected and all of your media are displayed.
- Date – This dropdown allows you to select, by date, which media are displayed in the grid view. By default, All dates is selected and all of media are displayed.
- Media category – This dropdown allows you to select by media category (if available). By default, All Media Categories is selected.
- Search – To the right, is a search box where you can enter a word, or series of words to search and display all the media meeting your search words.
- Filter – Clicking this button applies the settings you select in the dropdown.
Using selection, actions, and apply (list view)Link to this section
Selection
This screen allows bulk actions to be performed on one or more media selected in the table. For bulk actions to be performed on multiple media at once, those media must be first selected via one of these methods:
- Select one media at a time – To select a media, the checkbox to the left of the media entry must be checked (clicked). It is possible to keep selecting more media by checking their respective checkbox.
- Select all media in given table – All media in a given table can be selected by checking the checkbox in the table’s title, or footer bar. Of course, unchecking the header or footer title bar checkbox will cause all entries in that table to be unchecked (NOT selected).
- Reverse Selection – A reverse selection means checked items become unchecked, and unchecked items become checked. A reverse selection is accomplished by holding the Shift key on the keyboard and clicking the header or footer title bar checkbox.
Actions
Actions describe the process to be performed on particular media. There are two styles of actions that will be referred to as Bulk Actions and Immediate Actions. The follow describes these actions:
- Bulk actions – These actions can be performed on one, or more media, at one time, if those media have been previously selected. Bulk actions are available, when appropriate, as choices in the bulk actions pulldown box, above the table. The only bulk action allowed is delete permanently.
- Immediate actions – Immediate actions are performed immediately, on an individual media. Hovering the mouse cursor over the media row reveals the Edit, Delete Permanently, and View options under the file column, in that media row. Clicking on a media title will also initiate the edit action.
The available actions are described below:
- Edit – This immediate action displays the Edit Media screen. This action can be initiated by clicking on the title. See the Attachment details section for details on editing media information.
- Delete permanently – This action deletes the media. Delete permanently is available both as a bulk action, and an immediate action.
- View – This action presents the media in a simulated view of how the image would look when displayed in your theme. View is available only as an immediate action.
- Copy URL – This action will copy the full link to the media.
- Download file – This action will download the media.
- Attach – Clicking the Attach link in the Uploaded to column triggers the Attach to existing content dialogue box to appear. From this dialogue box, you can select a Post or Page that the media should be attached to. Follow these steps:
- Search post or page by keyword.
- Select the post/page one wants to attach the media.
- Click the Select button.
Apply
After one or more Media are selected, and after a Bulk Action is specified, the Apply button performs the given Action on the selected Media.
- Apply – Click the Apply button to execute the Bulk Action, specified in the Actions pulldown, on the selected Media. Remember, prior to executing Actions, one or more Media must be selected.
Attachment details (list view)Link to this section
In the media library list view, clicking an image thumbnail, audio icon or video icon will display an attachment page, which allows you to preview media and make quick edits.
You can also delete individual items and access the extended edit screen from this attachment page.
The attachment details screen will change its appearance and information according to media type.
The left side of this page shows the image, audio player or video player. The right side lists the following media file attributes and optional data. Some of them are editable from this page.
- Uploaded on – The date when the media file was uploaded.
- Uploaded by – author who uploaded the media.
- Uploaded to – Title of the post or page that contains this media. Click on the title to view that post or page in an edit screen. If the media was unattached to any post or page, this line does not appear.
- File URL – Read-only display of a direct link to the media file.
- Copy URL to clipboard – Click to copy the URL of the file into the clipboard.
- Download file – Downloads the media.
- File name – The name of the media file.
- File type – The MIME Type of media file.
- File size – The file size of the media file.
- Dimensions – (Image files only) The dimensions of image media.
- Delete permanently – Permanently deletes the media file.
Below the media file additional attachment details are displayed, depending on the media type.
Image files:
- Alternative Text – The alt text for the image, e.g. “The Mona Lisa” to describe the media. Used for accessibility.
- Caption – A brief explanation of the media.
- Description – An explanation of this particular media.
Below images, there is a button to edit the image. This allows you to make edits such as rotate, scale, and crop.
Audio files:
- Caption – A brief explanation of the media.
- Description – (Displayed on attachment pages) An explanation of this particular media.
- Artist – Singer, composer or producer of this media.
- Album – Album title that includes this media.
Video files:
- Caption – A brief explanation of the media.
- Description – (Displayed on attachment pages) An explanation of this particular media.